OE Construction Corp

Using Cloud Based Reporting to Improve Construction Communication Between the Field and the Office – OE’s Story

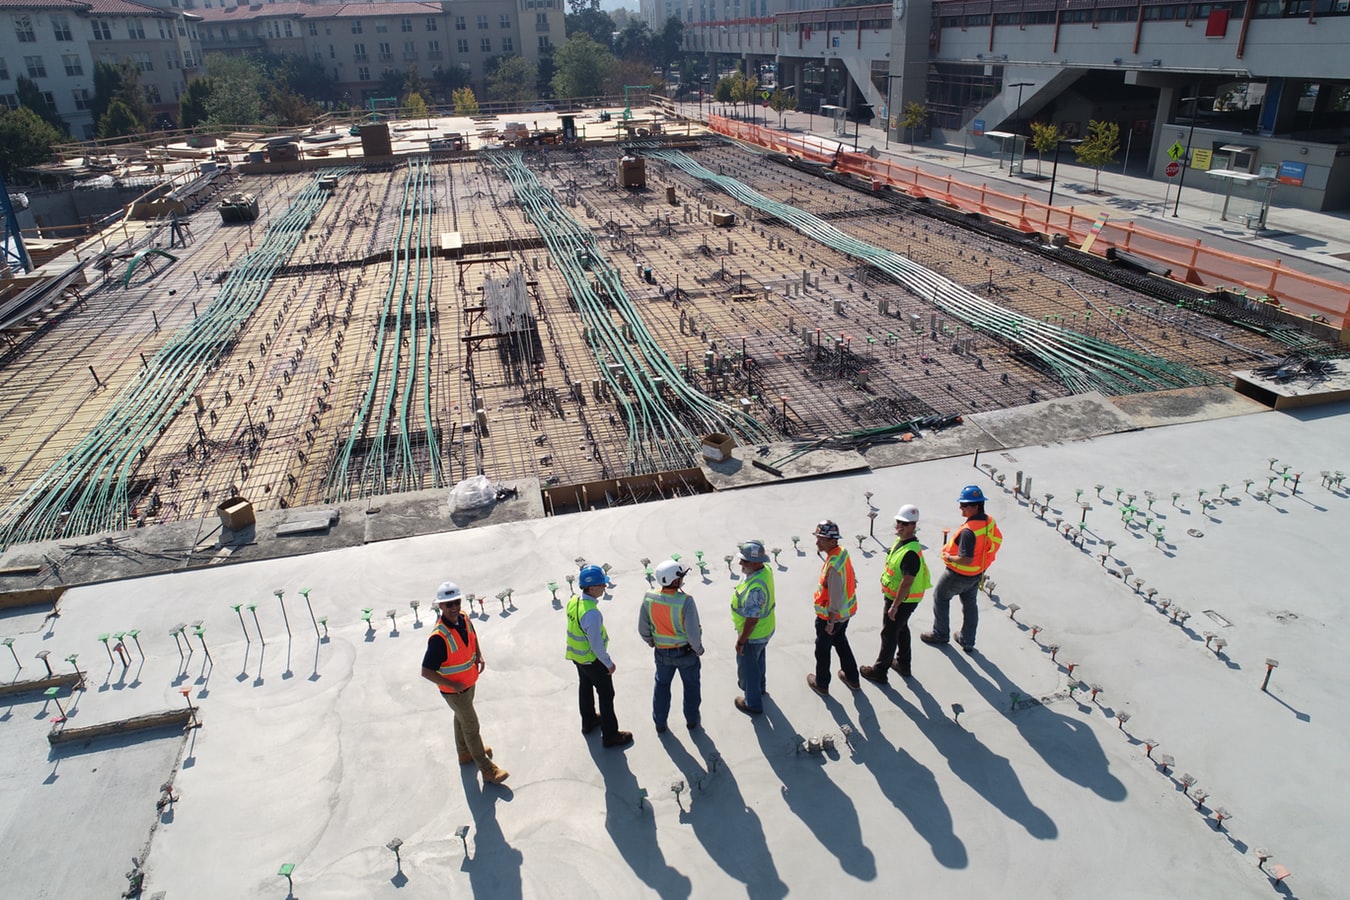
In 2015 OE Construction developed and deployed a cloud based daily reporting system for the OE field supervisors. Essentially the project information, including pictures and other important project data, was captured via a tablet, saved in the cloud and emailed to the main office for review and documentation of the job site on a daily basis.

Define the Problem and Find a Solution

This was the first step in providing a quick, easy and consistent method for the OE field supervisors to communicate with the OE Project Managers and others in the company. Fast forward to 2019, OE needed a more robust and more diverse data capture and reporting system, that covered a dozen different requirements and reports from the field to the office.


The first step was for the company stakeholders to define and then evaluate our core data collection and reporting requirements. Sounds easy right, but when you are working with multiple departments, both inside and outside the company, this process quickly becomes bogged down in trying to accommodate everyone’s wish list. First up, you can’t burden the field supervisors and field employees with so much data entry they can’t get their real job done. Instead of focusing on just “what do we (the office) need out of this system”, we made sure that both the field and the office were a part of the process.


As we began to really define the information, reports and end results for everyone in the company, it became apparent we did not have the resources to develop our own custom cloud based system as we had done in the past. Instead, we spent many months evaluating existing cloud based systems that would meet our specific needs. Number one on the list was flexibility, customization and ease of use.

OE chose a system with a company called Assignar Construction Software (www.assignar.com). Once the company had determined that Assignar was a good fit and within our budget, we set about defining and creating the required forms for field reporting and worked on a deployment, testing and training schedule.

Testing and Training

Key to the implementation was involving everyone in the testing and deployment process. When everyone is a part of the process, the deployment will go much smoother and you will achieve a higher rate of adoption by the employees. Next came the testing and training portion, just as important in our opinion. OE developed the training materials and scheduled training time with all of the employees, many times the training taking place in the field (not in the office).


Assignar’s team helped to develop the initial field reporting forms and Assignar was an important part of the design and implementation process. OE was able to deploy our first field application in 30 days, starting with our “beta testing” group of employees. The application was widely accepted and soon everyone wanted access to the application, which is device compliant for phones, tablets, desktops; making the installation of the app quick and easy.

Once the first field app was up and running, we moved ahead with the implementation of 12 additional forms. Some of the forms are for all of the employees use, some are specific to supervisors. We established our behind the scenes process in the office to receive the data on a daily basis and made sure we allowed time for testing, training and implementation for each new process and form

Saving time, Saving money

The end result, in our opinion, was outstanding. The employees were excited and motivated to use the new reporting system across the board. The time savings for both the field and the office has averaged over 20 plus hours per week, a big deal in our industry. When COVID-19 hit this year, the system was even more valuable, we were able to implement a COVID-19 reporting form in a couple of hours and publish for the field the same day.


When implementing new technology in your company, make sure you pay attention to the employees that will actually use the system (don’t design in a box, just for certain departments or managers). Be clear about the goals and objectives for the new technology, whatever the application. Document each process, document the implementation plan, get everyone on board to ensure the successful adoption of the new technology in the company and don’t forget to thoroughly test the system and train everyone involved. Just some thoughts from our experience in the construction industry.

OE Construction Corp

How to Make Subcontracting Simpler – and More Successful

How to be more successful as a construction subcontractor – our thoughts…..

When a “Subcontractor Specialist,” such as; a plumbing contractor, utility contractor, earthmoving contractor, and so on, is under the leadership and contracted to work for a General Contractor (GC), the smart Subcontractor Foreman realizes that the relationship he or she establishes with the General Contractor’s project senior field leader (Superintendent) needs to be positive and proactive.

In this article I’d like to address how a Subcontractor Foreman, representing a Subcontractor Specialist, can project a positive presence and be proactive in connecting with their General Contractor Project Superintendent. 

Positive in Presence

This is where first and lasting impressions are made.  The Subcontractor Foreman can promote collaboration and a good working relationship with the GC Superintendent assuming the Subcontractor Foreman’s attitude is upbeat, positive, and committed to the completion of their portion of the project.  This collaborative and positive attitude will help both the Subcontractor Forman and the GC Superintendent throughout the project duration.

Consider a few positive actions with working with a GC Superintendent:

  • Introduce yourself to the GC Superintendent upon first arrival.  Don’t wait for them to come find you.
  • When you meet the GC Superintendent, shake their hand or in the case of COVID-19 maybe a quick nod and look at them confidently in the eye.  The lack of eye contact by the Subcontractor Foreman could signal weakness, being unprepared, and “I really don’t want to be here.”
  • Make it a habit to start your arrival each day asking the GC Superintendent, “How’s it going?” and following that up with “Anything new developed?” 
  • Monday’s arrival should include the “look ahead” for that week of work. Many Subcontractor Foremen don’t speak up about the day or weekly plan, but those who do communicate with the GC Superintendent are one step ahead.
  • When someone brings a negative situation to you, adapt an attitude that includes, “OK, that doesn’t sound great but let’s give our best shot here and see what we can come up with to solve the issue.”  GC Superintendents love the Subcontractor Foreman who sees problems as opportunities.
  • Let the GC Superintendent be the first to know good news.
  • Once in a while, bring food to a meeting (if allowed on the jobsite).
  • If your team is celebrating with a lunch, invite the GC Superintendent.
  • Be sure to introduce the GC Superintendent to your workers when the opportunities arise.
  • Drop by the GC Superintendent’s office or work area on the way out every day.  If he (or she) is there, make some small talk. Share what you completed and where you would like to start the next morning

Never miss an opportunity to make a good impression with your GC Superintendent – make a sincere effort with everyone on the job site.  

Proactive in Connecting

Being positive is important but actually engaging the GC Superintendent requires an intentional effort. Subcontractor Foremen that have a focus, a plan, and want a good job site relationship based on transparency and trust always come out ahead. Your proactive efforts to connect with the GC Superintendent will help build both your crew and the Subcontractor Company reputation as a “preferred subcontractor.”

Consider a few proactive actions when connecting with the GC Superintendent:

  • When giving the GC Superintendent your week’s schedule (aka, the Look-Ahead), be sure to point out what actions by the GC and other Subcontractor’s need to be complete or out of the way to help you and your crew meet the schedule. 
  • Keep your GC Superintendent updated each day (sometimes more than once a day); this will help build a good line of communication with the GC Superintendent.  Many Subcontractor Foremen tend to avoid their jobsite GC Superintendent and that’s exactly the wrong thing to do.
  • During weekly jobsite meetings be a good listener, take notes, and engage the discussion periodically. Offer to assist another Subcontractor if it will help you with your schedule (like moving materials or other items in your way).  Such an effort sends signals that you are a team player.
  • Ask the GC Superintendent to come by and inspect some of the efforts of your crew (maybe it’s a tough area to work around, the work is extremely complicated, etc.).  Better to get the GC Superintendent’s thoughts on “quality of work” early. This effort also sends a signal to the GC Superintendent that you are not afraid of their presence or an honest assessment.
  • Work to develop a daily “hi-lo” update for the GC Superintendent and deliver it verbally. When a challenging issue arises, especially one that the GC Superintendent knows about, take the lead on trying to resolve the issue. Take up the challenge, letting the GC Superintendent know that you are “on it.”
  • Place some simple “signage” in your work area that communicates where tools and materials are to be kept, organized etc. This is really a big deal for many GC Superintendents as they like to see organization from their Subcontractors.  Also make sure your work area is clean and the crew is disposing of trash and other items in a timely manner each day.  Don’t leave a mess for others.

There are a host of other proactive efforts that you can take as a Field Foreman and Leader when reporting to a GC Superintendent, but the primary focus should be that you are proactive about getting in, performing and promoting a quality and safe work site, and over-communicating your progress.  If done right, you will find the collaboration and communication efforts help build your relationship and the Subcontractor Company relationship with the GC Superintendent and the General Contractor Company.  This process will make the project go faster and smoother and also put you in a good place to win additional work with your customer (the GC Contractor). 

OE Construction Corp

Teaching the Basics…Again!

The reality is that training new employees is an ongoing task as new workers continue to enter the industry and your company; these six tips can help.

There are times in construction when a company brings in new employees (young, old and in the middle) that have limited experience in the construction industry. They make up a diverse group and a true challenge when it comes to integrating and training new employees into the company culture and operating means and methods.

So, here we go again you might say. As contractors, we are all searching for the best workers we can find, but for many that list appears to be shrinking. We often find that the one significant behavior that must change among all of our leaders and experienced supervisors is that we all must be more engaged in training and educating the new workforce.

This reality is sometimes tiresome for many seasoned veterans, but what are we left to do to move past this situation if we do not commit to training. As one Foreman told us, “I know I’m going to have to train the new guys, but it gets old real fast!” Translation? “This really stinks!”

Well, let’s jump right into some ways that we can tackle this reality and put the complaining aside. Consider some of the best lessons we have found in teaching the basics to our new employees.

1. Don’t wait for any opportunity to train and educate…just do it

There will be very few perfect times to train and educate if you are thinking of classroom based learning. Just not going to happen that way. Perhaps 80% or more of the effective training and educating takes place right on the job site…so don’t wait for the magic one to two hours to conduct your training. The job site is the place to start and follow up with specific safety and equipment training outside the job site to really hone in on the additional knowledge and skills for each employee.

2. Turn every work task into “mini-learning” sessions

If your mind is set to look at every action your people need to perform as learning sessions, this will greatly change your attitude, approach and behavior about training.

Many of these tasks are simple but critical to a better, safer and profitable result. Don’t overlook teaching your new workers the most basic of tasks to ensure that what little they do know, they will perform consistently.

3. Educate workers on the “why”

Rushing to train a new worker on how to add water when performing soil compaction will be better taught if the employee understands why and how we do what we do. Again, if employees learn the “why?” behind what they are going to do physically, they will more quickly connect the dots on how to be more effective in applying your instruction.

This method also tends to strengthen the new worker’s understanding when they run into a problem and helps them to correct errors faster.

4. Teach – Demonstrate – Watch – Debrief

Breaking the actual learning process down, try to follow the sequence of actions described for this point.

  • Teach is to educate
  • Demonstrate provides a visual model of what the employee will want to emulate
  • Watch allows you to observe the effort put out by the worker to replicate what you have both taught and modeled
  • Debrief allows you to question the new worker about what they just performed and what they might do better on their next effort

This four part teaching/training process is easy to follow and simply needs to be repeated over and over as you move a new worker through their learning experience.

5. Teach and train in smaller bites of time and process steps

Most of our new workers just do not learn everything we want them to in one lesson, much less in one day. While most contractors realize this, their efforts to train their new workers often fall short of anything resembling a thorough and well thought out training effort.

If the new employee’s experience in the first few days leads them to doubt the company’s commitment and support, there is a very good likelihood that the employee may quit before the first week is up.

6. Develop a training plan and spell out the first 90 Days

Do not train by using the old “shoot from the hip” method…it doesn’t give you a very good return on training. Instead, sit down and map out exactly what you are going to train new workers on, breaking down the task or action into specific steps.

Also, consider who is the best individual(s) to train the different tasks and processes your crews follow when working, and assign them to train on those areas.

As the workforce of today and the future enters into the construction industry, training is one of the important ways to retain workers and build your company. Some contractors experience employee turn-over rates that are over 50% in a month. This is non-productive, frustrating and impacts everyone in the company.

Rather than postponing the inevitable or hoping that you or your HR Manager can magically find trained and motivated workers, give more focus and energy to turning all of your leaders and better skilled workers into trainers. Be patient with your new employees; spend extra time with them, encouraging them to come to work and to be patient with themselves.

Training isn’t easy…that’s why so few do it. However, for those contractors who will invest in doing more and better training with their new employees, they will realize greater results faster than most of their competition.

Good Training!

OE CONSTRUCTION CORPORATION

OE Construction Corp

Excavation and Site Work Contractor Digs In with Connected Technology from Trimble

Customer Profile
OE Construction is a Colorado-owned and operated excavation and underground utility company. Founded in 2006, the company services include overlot and site grading, structural excavation, site utilities, stormwater management and demolition with customers throughout the Mountain West.

Business Challenge
Continued advancement and innovation in processes and technology have been a hallmark of OE Construction since its inception. A critical step is the investment in systems that drive project productivity and efficiency while improving quality for customers.

Solution
• Trimble® Earthworks Grade Control Platformimage1
• Trimble SPS882 GNSS Smart Antenna and Trimble Tablet
• Trimble SCS900 Site Controller Software
• Trimble SPS852 GNSS Modular Receiver
• Trimble CCS900 Compaction Control System
• Trimble Connected Community
• Trimble Business Center

Benefits
• Calculate accurate real-time volume measurements from machines
• Less chance of rework
• Eliminated need for survey stakes
• Average 20% productivity increase
• Transparency with clients/general contractors


Since its inception in 2006, OE Construction has been an earthwork and site development company with a technology edge. While a then 19-year-old Chris Olson, founder of the company, started with just a skid steer and a mini excavator, he knew that he could make a difference in the dirt moving business with a good team, a strong work ethic and a little help from technology.

Early on, he began evaluating the benefits of Trimble technology to improve productivity on the job and provide better quality to the customer, and to help expand into underground infrastructure and site utilities. He initially invested in Trimble TSC2 Controllers, receivers and base stations, as well as the Trimble GCS900 3D Grade Control System for multiple machines.

The company grew revenue from $150,000 the first year to $20,000,000 in the first six years, working on a range of earthwork projects as well as expansion into utilities. That sixth year proved to be a milestone year for the company.

Enter 3D Site Prep
In 2012, Trimble initiated the first phase of construction of it new Rockies campus in Westminster, which included a 125,000-square-foot, 4-story building. OE Construction was all in as part of the civil/site preparation contract.

Olson recalled, “We needed to make use of 100% machine control along with all of the Trimble behind the scenes technology and tools. In 2012, machine control and 3D site prep was very new to most of the industry.”

Working closely with the regional Cat dealer, Wagner Equipment Co. and the Trimble dealer SITECH Rocky Mountain, OE Construction fully adopted 3D grade control as well as Trimble Connected Community and Trimble Business Center office software. With these solutions, Olson was able to cut the excavation schedule on the project by more than 30%. “With such tight margins, anytime we can cut our schedule and move more dirt faster, we have a chance to make money on a project,” he said. “That’s an ROI worth making.”

Happy with the productivity gains enabled by Trimble technology, the OE Construction team fully adopted 3D project design and management for all future work and made more investments in surveying and machine control technology. Those investments would pay off again and again for years to come.

image2Quality Results
With help from technology, OE Construction has moved from a small player in the local Denver market to an innovative leader in the underground utility and earthwork market segments.

The company has continued to advance its fleet with technology-enabled solutions, most recently with the addition of the Trimble Earthworks Grade Control Platform, Trimble’s next generation machine control system with dual GNSS receivers for high accuracy, stability and performance of the blade in 3D.
The 3D Trimble Earthworks solution was particularly valuable on a recently-completed two year, multi-million dollar massive redevelopment and adaptive reuse project of the former University of Colorado Health Sciences Center in Denver. Responsible for all underground utilities and earthwork work on the project, OE Construction relied on Cat 349 excavators with Trimble Earthworks 3D and automatics, and a Volvo EC750 excavator with Trimble Earthworks 3D indicate.

“The value of Trimble Earthworks on a project such as the Health Sciences Center is better efficiency and measurement of the soil volumes while excavating, loading and ultimately moving the material at the site—volumes that are important to the client, the engineer and OE,” said Olson. “With Trimble Earthworks, we have real-time accurate data that is available on a moment’s notice to everyone involved in the project.”

image3
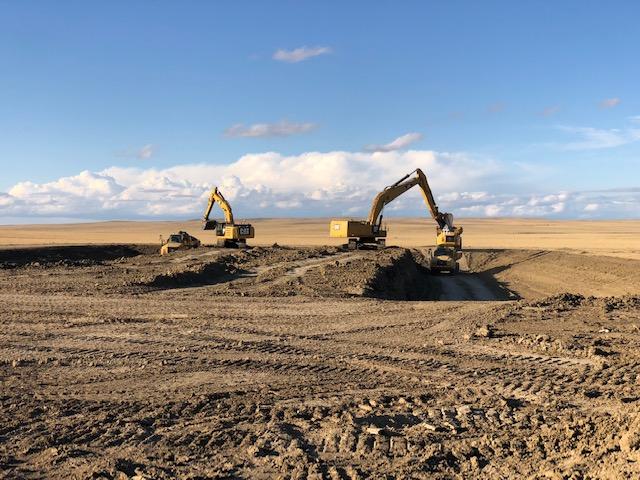
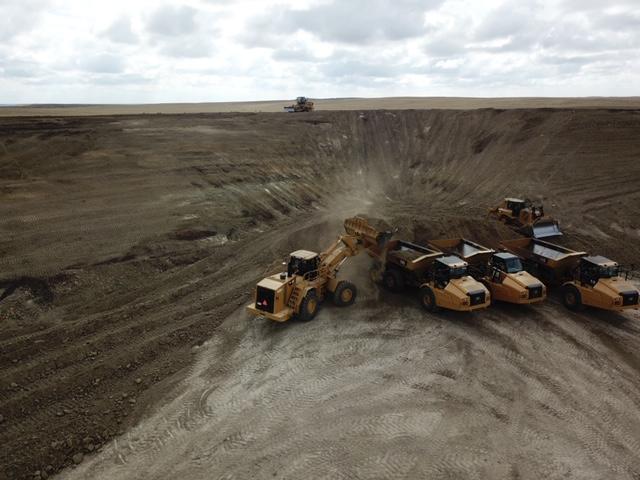
The Trimble Earthworks-enabled excavators are also helping the company expand services beyond oil and gas and commercial developments to landfills.

Currently, the OE Construction crews are using the Trimble Earthworks-equipped excavators for landfill site excavation on multiple job sites around Colorado and other nearby sites. A typical landfill project requires the movement of from 200,000 to 600,000 cubic yards of soil. The excavators are combined with articulated haul trucks to facilitate the movement of material from one location to another.

“We’ve seen huge value of the technology in landfill expansions and new builds because the job requires the movement of hundreds of thousands of cubic yards of material,” explained Olson. “There is certainly more risk on these jobs. Accuracy is essential, as is delivering a product to engineering specifications. We could do these jobs without technology, but our costs would go way up and we would need more equipment and manpower.”

On average, Olson said he sees 10-20% improvement with technology. When asked what’s next for OE Construction, Olson is quick to say, “We’ll continue to embrace technology to improve our processes on the job and in the office. We firmly believe that technology is the key to success today and in the future.”

OE Construction Corp

How To Determine Which Lot Is The Best Fit For Your Project

As a commercial builder, you probably break ground on new projects all the time. From warehouses to office buildings, to apartment complexes, and more, you’ve likely done your fair share of site preparation. However, you’ve also probably noticed that some groundbreaking is much more complicated than others. 

While you don’t always have a say in where your clients choose to build their properties, there are lots of things to consider. What makes one lot a better fit for a project than another? 

From cost to soil quality, to location, and more, we’re breaking down how you can determine which lot is the best fit for your project. Using this information, you’ll be able to help guide your clients towards choosing the right lot from the beginning. 

image2

Consider Budget

The first key aspect of determining the best lot for a project lies in the budget. It’s essential to consider the cost of the lot but also the cost of the land preparation, building materials, and construction itself. If your client chooses a lot that’s far out of budget, then it’s doomed from the start. Annual taxes and project timeline for the lot are also crucial for budget consideration. 

Think About Location

Sometimes the best-priced lots are priced that way because their location is subpar. It’s critical to assess the site. If you’re building a building that needs to be accessed by customers, then it needs to be in an area that customers can easily access. If it’s a project where only employees need access, you’ll still want to consider their drive time and ease of arriving at the lot’s location before signing the dotted line.  

Consider Legal Restrictions 

Be sure to check on zoning laws, usage restrictions, and the municipality plans for the lot’s location. Ensure the lot isn’t unknowingly located inside of an HOA district, or otherwise subject to some stringent rules. The worst thing would be to purchase and break ground only to realize that the original plans aren’t possible. 

Investigate the Topography

If you haven’t seen the plot, it’s imperative to investigate the features of the land. Are there hills, or valleys, or cliffs in the area? If the lot isn’t close enough to go and take a peek, you can always peruse Google earth to get an idea of the general land topography.  

Think About the Weather

Is the lot in a flood zone? Is it in an area that gets hit by particularly rough weather? It’s crucial to know the weather conditions before you start building. While inclement weather might be a downer, it could also reduce the cost of a lot significantly. So, it’s necessary to weigh the pros and cons of the weather. If it’s located in a flood zone, the lower price probably isn’t worth the extra you’ll pay in insurance. However, if it’s in an area that gets a rough storm now and again, it might be worth investing in better building materials like ICF blocks, and taking the reduced upfront cost. 

Run a Percolation Test 

A percolation test, or a perc test, is particularly important if your lot is in a rural area. This test assesses the land’s ability to drain water through the soil. This test determines whether or not you can put a septic system on the property. If the lot is unable to connect to the municipal water lines and doesn’t pass this percolation test, it probably isn’t land you wan

While we’re talking about water, it’s good to know what public utilities the lot has access to. Again, this is going to be more important in rural areas. However, you’ll want to know if you’re going to have the ability to connect to municipal water lines. Additionally, take a look at the lot’s access to roads and public transportation. Is the lot accessible, or is it landlocked? 

Survey the Soil and Run the Environmental Tests

While you might want to skip this step, don’t do it. Environmental tests are done to ensure that the soil at the lot is not contaminated. This report is also where you’ll discover any poor soil conditions that might hurt the building process or the structural integrity of the future building. Completing these tests often results in a report called REC’s, and they’ll address any potential environmental concerns. It’s crucial to do these tests to avoid any construction issues. Additionally, if there are any environmental hazards, like toxic soil contamination, the property owner could be responsible for it if it’s discovered later, even if they weren’t responsible for it. 

Consider the Work that Needs to Be Done

After assessing topography, soil condition, budget, zoning laws, and more, you have to assess the amount of work that needs to be done to the lot before starting the build. If it’s a hilly area, it doesn’t matter if you get the right level, have the best team, and build the perfect building, the land will have to be excavated and graded first. To truly help your clients, it’s vital to look at the project holistically, from beginning to end and get a full scope of the entire project, not just your part as the builder. 

The Best Lot for Your Project

image1

Using the tips above, you’ll be able to adequately guide your clients towards the best lots for their projects. Remember, choosing the best lot is not all about cost or construction. 

The perfect commercial project starts with selecting the right lot from the beginning. Determining which lot is best often requires some in-depth analysis of environmental factors, zoning laws, topography, and more. 


Matt Lee is the owner of the Innovative Building Materials blog and a content writer for the building materials industry. He is focused on helping homeowners, contractors, and architects discover materials and methods of construction that save money, improve efficiency, and increase property value.